I have been wanting to put together a blog on the use of grips for quite some time. I have held off because it’s a difficult thing to “type” out. Today in a couple of my classes I addressed the use of them for the toe to bar component. While there is a lot that goes into the use of grips that is personal preference, there are also a few simple points that should be adhered to for everyone. I’ll also throw in some of my personal “tips” and you can take ‘em or leave ‘em, but just things that have worked for me. Being in the midst of the Open and having week one out of the way without any gymnastics, you can bet you’re going to be needing grips more than once in the next four weeks.
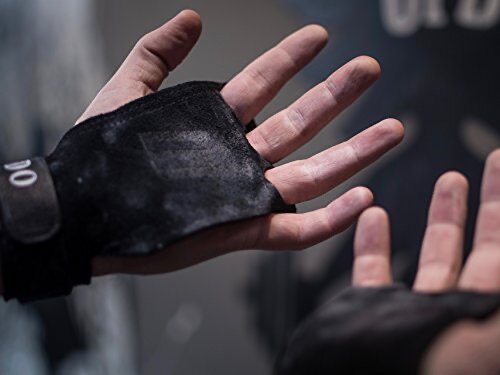
First, just so everyone knows what I am talking about when I say “grips”. I am referring to gymnastics grips for gripping the rig while performing movements there. There are all kinds of different styles out there but they all share a few common traits. First, something around your wrist to keep them in place. A Velcro enclosure fed through a buckle that you can adjust for how tight you like them. Then a piece of material extending over the palm of the hand and fingers. This is usually leather but there are some other options out there as well. Some have finger holes in them, others have loops attached to the end to put your fingers through, while others are just a “flap”.
Next, why use them? A gymnastics grip is designed for two main reasons. They are designed to help you have a better grip on the rig is number one. The “flap” on them, usually leather, is made to have better stick than your hands. Second, they are designed to help save your skin! We are all familiar with the dreaded “tears” from any volume of rug work. A grip will help prolong the life of your skin; and when used properly will all but eliminate those tears. As an added benefit, when used properly, they will also aid in your grip and help prevent fatigue from setting in so quick. More on this later.
I am not going to go too much into “fit” of them, as that varies greatly depending on the style of grip you chose. However, a couple things to watch for. Obviously make sure the strap is long enough to go around your wrist and stay closed. You also want to make sure the flap is covers at least to the third joint on your index finger (if you have the style with holes in them for your fingers, they’re going to need to be longer than that). Any reputable source selling grips will have a full sizing “how to” on their webpage that I strongly suggest you take a read of and do the measurements before ordering.
Ok, so now that you have selected your favourite grips and they’ve shown up and you’re ready to smash your first workout in them - here’s a couple things you should know. They’re going to need some breaking in. Depending on the grips and you as an athlete and how much “torque” you apply to the grips, this might take two or three workouts. Don’t get frustrated with them until then. You may be a little slower because you’re regrouping and chalking up in the first couple workouts in them. It’s ok. I assure you, no one remembers or cares. Just like any new piece of equipment or gear, they’re going to take some time to get used to. On that note, just because you have grips, doesn’t meant you don’t need the chalk bucket. Still put some chalk on your hands “under” the grip. Then, chalk the front side of the grip that is going to be on the rig. You don’t need to go nuts with the chalk (and believe it or not, there shouldn’t be a pile of chalk on the floor beside the bucket when you are done haha).
When you put the grips on, the strap around your wrist should be tight. Not “cut off circulation” tight, but they should stay in place (maybe with some exception depending on the workout but that’s for another time) and not be able to spin around your wrist. Most grips are designed to have the buckle be on the outside of your wrist (again, this will be in the instructions and how-to from any good grip company). That strap that goes around your wrist is designed to be “loaded”. This is where I see a ton of people go wrong. The flap isn’t just there as a piece of material between your hand and the bar. The whole grip is meant to do some of the work for you. When you are hanging on the bar with a properly loaded grip, the strap around your wrist should be tight and pulling. This helps take a little bit of the load of your actual hand and saves some physical strength grip fatigue. In order to make this happen, think “catch high” when you grab the bar. You want to “overwrap” your hands when you jump up. You should be doing your rig work on your first set of calluses on your palm. When you jump up to “set” and load your grip, make contact with the bar at the butt of your hand keeping the flap of the grip tight on the strap. As your hand slides down into that “first callus” position, the strap of the grip should get loaded up and pull on your wrist. Now your grips are doing some of the work for you. Simply jumping up and gripping as you would without a grip on and having that grip just act as piece of material between your palm and the bar isn’t doing yourself a lot of favours. I’ve actually snapped of couple of the plastic buckle grips from “loading” them up like this.
That’s kind of the long and short for using grips. Regardless of the type or style or material, you can and should apply those points. One thing you might want to try out, which in my opinion, helps to properly load and benefit from grips is not putting your fingers through the holes. Again, purely personal preference here but this works for me. When I use grips with fingers holes in them, before I jump up on the rig, I put just my finger tips (basically to my finger nails) into the holes and extend. This stretches the flap of the grip tight and “loads” the wrist strap. As I jump and catch high like I talked about in the last paragraph, I let my fingers come out of the holes. This helps to ensure the grip is set tight and loaded on my wrist. This is a very common practise and something that works well for most people.
A couple other quick tips for grips:
Let them dry! Don’t just jam them into your bag after using them (unless you like that moldy hockey glove smell kind of thing).
Close the velcro strap up when not using them. This helps the world’s lint supply stay free from captivity on it and makes it actually work like it’s supposed to.
Don’t store them folded seven times or crumpled up and rammed in the corner of your bag. Try to keep them as close to how you were them as you can. Hint: I hang mine on a carabiner on the outside of my bag.
Don’t be afraid of chalking them up. We talked about that above but chalk the inside and outside of them “before” you start a workout to save time during.
That should about cover it. If you are unclear on anything I have tried to make sense of here, track me down at the gym anytime and I’d be more than happy to help show you what I’m talking about. I’ll also say, there is a difference in an entry level “get by” grip and an actual good set. Before you invest some money in a good pair, ask your friends at the gym to try theirs. See what you like and what works for you. Again, feel free to track me down and ask for some advice here; I’ve tried a ton of different ones. I also have three or four different ones of my own at the gym you can take a look at.
While there’s a lot more to grips than just “that piece of material that goes between your hand and the rig”, hopefully this helps a little bit with using them correctly. Knock on wood, I can say that I have not torn my hands in two plus years! With any luck, you will be able to say the same thing in two years time.